webcomics
print
inventions
presentations
consulting

Archive for April, 2011


Ooh! New Toy.

Well, this is fun!: Using my morning blogging time this week to learn some new software (suggested in comments, thanks!) and put together a REAL video tutorial, with voice, covering last week’s lettering tips and some other stuff.

Look for something in this space late this week or early next. Thanks for checking in!

(Yeah, yeah, I know most of you get this via rss and don’t need me to tell you when I have nothing to tell you that I have nothing to tell you, but some geezers like me still check sites manually, so…)


Lettering and Panel Borders in Illustrator (Post 2 of 2)

[NOTE: I’VE SINCE DONE A FULL VIDEO TUTORIAL ON THIS SUBJECT THAT EXPLAINS IT A LOT BETTER THAN THIS! CHECK IT OUT HERE.]

[See yesterday’s post for the first half]

Okay, here’s some more info on my idiosyncratic method for lettering and panel borders. With luck, I hope to make this post obsolete soon by creating a proper video tutorial. But first… gotta finish what I began.

Part 4: Panel Borders

Now might be a good time to mention that, as in yesterday’s balloon explanation, this is how panel borders are made the first time you make them. After that, you’ll want to create a template. I’ll show you my template at the end but everyone’s template is different.

Basically my panel borders use that same stroked-content appearance that the word balloons use. The key is create a new layer set above the balloons and text, with its own stroked appearance so that it overlaps the balloons.

The result should look exactly like a white wall with windows cut out of it that the balloons (and eventually, the artwork) can appear behind.

VIDEO: Making Panel Borders

1. Same document as last time.

2. Create a new layer, name it “Borders.”

3. Select the rectangle tool from the tools palette

4. Set its color to white, no stroke.

5. Create the outer box for your page. I’m just doing a sloppy job in the video—proof of concept only. You’ll want your eventual template to be to specific measurements of course. (see Part 5).

6. Again, repeat the stroked appearance technique from Part 1, steps 7-9.

7. Draw in the panel gutters, as if they were window sashes. If you’re like most of us, you’ll want all the gutters to be consistent sizes, so you can just drag and copy (personally, I make my horizontals a bit thicker, but everyone has their own preference).

8. Lock the “Borders” layer when you’re done.

9. Select the balloon and drag it around to see the window effect. (VIDEO)

10. Play Words with Friends for a while, argue about Game of Thrones on Facebook—Hey, get back here!

Part 5: The Template

So, everybody’s template will be different, but if it helps, here’s some info on mine.

Open this Screenshot of my Template in a new window and read the below info alongside it.

You’re looking at a file in Illustrator that’s ready to be exported to Photoshop so that I can start drawing. (Technically, I’ll be exporting a copy of this file that has all that crap around the margins deleted, but this way, I can explain the crap).

At left, you’ll see some useful balloon and caption shapes and various tails (arranged in odd-looking circles so I’ll have any angle I might want). The text boxes are already placed in their balloons, with a single “x” in each that I can select to begin typing.

At top and on right are the panel gutters. The fat ones are for the space around the panels, the thin ones for the regular gutters. I have a lot of bleeds in this book, otherwise, I’d just put the fat ones in place in the template and leave them there.

I have a standard grid that I’m using (2, 3, or 4 tiers, depending on the page, and regular divisions width-wise), so the regular gutters are positioned to copy-drag in.

At top, toward the left, you’ll see a big letter “L.” Since this is for print, there’s a slight difference in layout between Right and Left pages. This is the Left template. I don’t wanna mix them up! They look pretty similar.

My layers have odd names—for reasons I’m not even sure I can explain, except to say that it helps me spot them at a glance. Here’s a bit on each.

The bottom layer (cleverly named “____________”) is just a blue background to help me see the balloon and gutter widgets more easily. Also I like blue. Notice that it’s locked. Really good idea to lock whatever you’re not using.

Next layer is “||| <rough>.” Why the vertical lines? Fucked if I can remember! I’m sure I had a good reason at the time. The art is a rough layout, not finished art. I’ve placed a copy of that rough in the layer and, using the little pop-up menu in the layers palette, set the options for the layer so that placed images like this one are nice and dim.

The balloon and lettering layers are next. If you like, you might want to have two or even three balloon layers so that balloons from different characters can overlap without joining together.

“GUT” is gutters of course. Did I mention that all of these layers will be renamed in Photoshop?

“#” is the page number. The page number needs to sit OVER the gutters, since it’s not in one of the panel windows. Ditto for other overlapping elements.

The “Outer Box” layer marks the extra border area that will be trimmed away in Photoshop (that dark blue box around the page). Helps isolate it visually for me, though it’s not strictly necessary. It’s… I dunno… I like it… It’s blue.

The “<grid>” layer is just a red line guide to help me place the layout and other elements. Not visible in this screenshot (notice the absent eye icon in the layers palette?). I don’t have to bother deleting it because I set its options (in the layer palette’s pop-up menu) to not “print,” which also means it doesn’t export.

I’ve found lettering this way incredibly easy and pretty fast. I open the template, drop a layout page in, drag in the balloons, type in the text, throw on the tails, tweak it a bit, and I’m done.

I export a duplicate of the file (with all the extra stuff deleted) to Photoshop at 1200 dpi grayscale, keeping the text editable.

Then in Photoshop, I hit a button in the Actions palette* and it renames and rearranges all the layers (and adds quite a few new ones) in a matter of seconds.

The resulting file is ready to draw in. AND, if I need to make a change in the lettering later, I can do so right in Photoshop, since the lettering itself is still editable.

That’s it for now. Hope this is useful to someone!

Next: I’ve found a program I like for better screen recordings with voice. If I get time, I’m going to try to create a more sophisticated video tutorial, so we won’t need this clunky thing anymore.

[*One tip on recording layer changes in Actions: All layer names should be unique, and if you create a new layer while recording, be sure to rename it immediately; one document’s new “Layer 7” may be another document’s new “Layer 12”]

Oh! And one last unrelated, but important note: Sky has decided. Santa Cruz it is!


Lettering and Panel Borders in Illustrator (Post 1 of 2)

[NOTE: I’VE SINCE DONE A FULL VIDEO TUTORIAL ON THIS SUBJECT THAT EXPLAINS IT A LOT BETTER THAN THIS! CHECK IT OUT HERE.]

More cartoonists than ever are using fonts instead of hand-lettering. The results are mixed of course, but hey, we’re all learning.

Personally, I like lettering on the screen. One of the reasons is that I found a method I’m really comfortable with and that’s been very efficient and even enjoyable over the years.

I mentioned this in Making Comics and promised to explain in greater detail, so here’s that (long overdue) explanation.

The examples below are in Adobe’s aging Illustrator CS3 and should work with tweaks in even older versions, going back to at least 2005, and I assume newer ones. (I have CS4, but didn’t even notice I was working in an earlier version until I’d already captured videos of the examples—sorry!)

Part 1: Doing that Stroke Thing in the Appearance Palette

Our friend Nat first pointed out to me how useful the Appearance Palette could be when making balloons.

The idea is to make layers for the balloons and panel borders in which borderless white shapes would have a stroke appear around them when overlapped—which sounds boring, but is actually pretty cool-looking and incredibly useful.

VIDEO: Making a stroked layer in Appearance

1. Open Illustrator, make a new doc, etc…

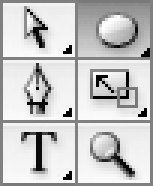
2. Using the “Window” menu, bring up the Tools, Appearance, Layers, and Color palettes (if they’re not already showing).

3. Make a big gray box with the rectangle tool (this is just to make the next steps easier to see). Lock the layer.

4. Create a new layer above the gray box. Name it “Test Layer.”

5. Pick any shape tool (rectangle, ellipse, star). Make a few shapes on “Test Layer.”

6. Select all the shapes and set their color to white fill, but no stroke. They should now appear as borderless white shapes (and you can actually see them ’cause you’ve got the gray box layer behind them).

7. Next to “Test Layer” in the Layers Palette, click on the little circle to the right to select all the contents of the layer (all those shapes you just made).

8. In upper right-hand corner of the Appearance Palette, click on the tiny pop-up menu symbol. From the menu, select “Add New Stroke.”

9. Still in the Appearance Palette, click where it says “Stroke 1 pt” and drag it down until it’s just below the word “Contents” (I’m sure there’s a more efficient way to do this, but I don’t care).

10. Try dragging your shapes around. Notice something cool: whenever the shapes overlap, there’s a black border around their combined shape only.

11. Think: “Hey! This would be awesome for word balloons and panel borders.” Pat self on back.

Part 2. Making the Classic Word Balloon Shape

There’s no “right” shape for word balloons, of course, but if you do choose the traditional round style, as most cartoonists do, I strongly suggest avoiding the unmodified ellipse. It looks butt-ugly and doesn’t hold words well at all (especially if the words are in a rectangular text box—Blech!)

This is how to get that classic balloon shape that’s evolved over a century of trial and error.

VIDEO: Balloons and Tails

1. Keep that same document, but delete “Test Layer.”

2. Create a new layer called “Balloons” and another called “Text.”

3. Select the “Balloons” layer.

4. Select the ellipse tool.

5. Again, set color to white, no stroke,

6. Make a few wide ellipses of varying shapes.

7. From the Tools Palette, pick the Direct Selection tool (the open arrow symbol).

8. Click-select the far end of one side of one of the ellipses.

9. Squash the ellipse, just a little, by moving the (now visible) control point a small distance toward the center of the ellipse. Do the same on the other side. There’s no right amount, just whatever you think it needs. Feel free to squash a bit on top and bottom as well, though it shouldn’t need it as much.

10. Create a couple of tails as well, using the pen tool.

11. Select the contents of the layer “Balloons” (see Part 1, Step 7).

12. Add the stroked appearance to the “Balloons” layer via the Appearance Palette just like last time (steps 8-10 from Part 1).

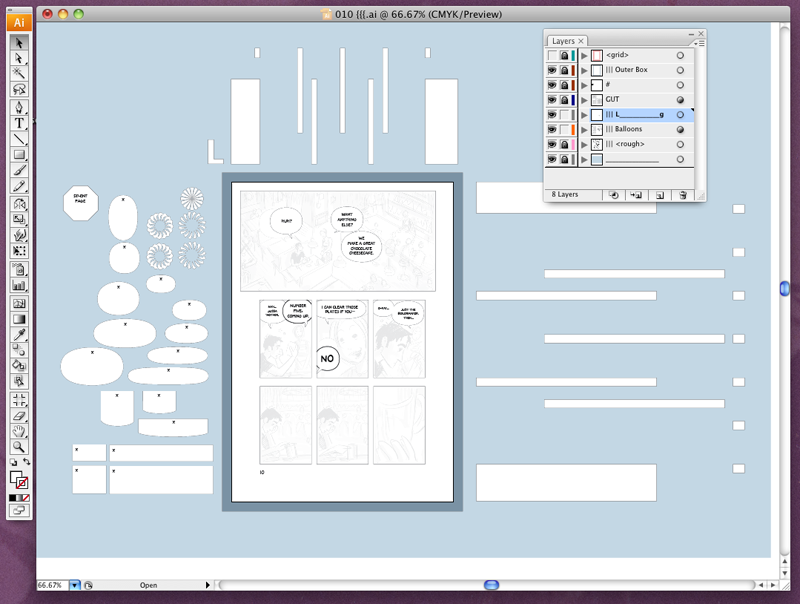
Part 3: Creating Balloon-Fitting Text

Next you’re going to want a text area perfectly fitted to the balloon. With luck, you’ll rarely have to use the return key when typing in dialogue. The words should just flow naturally into the available space.

VIDEO: Adding a Text Box

1. Using the same document you just made for Part 2, select the “Balloons” layer.

2. Select one of the balloons (just the modified ellipse, not its tail).

3. Pick the Scale Tool from the Tools Palette.

4. Click a little below the center of the selected balloon shape.

5. Shrink the balloon shape down about 70% by click-dragging the scale tool, while holding down the Shift and Option keys. (Basically, you’re making a copy, so now there are two shapes, one inside the other.)

6. Notice that the inner shape sits a bit low.

7. While the inner shape is still selected, pick the Type tool from the tools palette.

8. Moving the type tool cursor over the selected inside balloon shape, notice how the cursor changes appearance? When it’s just inside the balloon, it should change to a hexagonal shape indicating that it’s ready to put words inside the shape rather than on the outside. Go ahead and click there.

9. Try typing inside the small balloon shape. With luck, it should now be a round text area you can put words into.

10. Select the text box, and in the Layers Palette, drag its little color box on the right up to the “Text” layer (in other words you’re moving whatever is selected to that layer. (This is so that the words won’t have that stroked appearance that our balloons do, for those rare cases where the words might run outside the balloon).

11. Try resizing the balloon and text boxes.

Tomorrow: Adding Borders, and Creating the Your Own Template

…and why you’ll only have to do this stuff once!


Working on something…

Okay, this is a lame week, blogging-wise. Sorry!

I’m working on a post about my lettering technique (in Illustrator) and it’s taking a bit longer than I’d hoped. I’ll have something up tomorrow.


I Have Nothing to Say Today…

…so here’s a picture of Kaiser Wilhelm II.

Looks kinda like Liam Neeson, doesn’t he?


Okay, About Source Code…

Just gotta get this off my chest…
(it’s all in the first comment)

SPOILERS!

DON’T READ UNLESS YOU’VE SEEN THE MOVIE.


Hobo Lobo

Speaking of experimental comics, Hobo Lobo of Hamelin is a cleverly designed multi-plane side-scroller by Stevan Živadinović that most of you can probably view without any technical hiccups.

I like the multi-plane effect. Full-out 3D could also work for scrollers like this of course. The key is in maintaining the work’s identity as a still life; even though navigating through it might be filled with dynamic motion.

[link suggested both on Twitter and in yesterday’s comments]

Meanwhile, Dylan Horrocks has details on Darkest Day, a benefit book for the victims of the Christchurch, New Zealand earthquake which can be purchased here.

That’s it for this week. See you all Monday!


Is it my Imagination…

…or has there been an increase in the number of extended canvas webcomics by young artists lately?

Maybe it’s just wishful thinking on my part (they laughed at me at the academy, the fools!) but yesterday alone, I got two emails from relative newcomers, both consciously exploring webcomics’ unique spatial opportunities.

Check out the lovely art in Ada Starfield (above) by “Darcie” and Shira-chan’s playful The Ketchup Conundrum; two very different comics, but both ditching the page metaphor in their own way.

Maybe all we needed was a few spatially sophisticated popular stories like Emily Carroll’s His Face All Red or Daniel Lieske’s Wormworld to kick off a new round of digital exploration. Maybe it’s just a temporary blip. But hey, it’s nice to see experimentation on the rise again for as long as it lasts.


And Yet the Waves Keep Moving…

Bottle from Kirsten Lepore.

[via Ivy’s friend Caroline]


The Periodic Table of Storytelling

This is cute. Seems to have gone up about a week ago. I think… Hard to tell with these things.

I like the suggestion that it would make a good dartboard — and that Hollywood should never be allowed to play.

Might be fun to use with Rory’s Story Cubes (maybe for 24-Hour Comics Day!)

[link via Byron Woodson]