[NOTE: I’VE SINCE DONE A FULL VIDEO TUTORIAL ON THIS SUBJECT THAT EXPLAINS IT A LOT BETTER THAN THIS! CHECK IT OUT HERE.]
More cartoonists than ever are using fonts instead of hand-lettering. The results are mixed of course, but hey, we’re all learning.
Personally, I like lettering on the screen. One of the reasons is that I found a method I’m really comfortable with and that’s been very efficient and even enjoyable over the years.
I mentioned this in Making Comics and promised to explain in greater detail, so here’s that (long overdue) explanation.
The examples below are in Adobe’s aging Illustrator CS3 and should work with tweaks in even older versions, going back to at least 2005, and I assume newer ones. (I have CS4, but didn’t even notice I was working in an earlier version until I’d already captured videos of the examples—sorry!)
—
Part 1: Doing that Stroke Thing in the Appearance Palette
Our friend Nat first pointed out to me how useful the Appearance Palette could be when making balloons.
The idea is to make layers for the balloons and panel borders in which borderless white shapes would have a stroke appear around them when overlapped—which sounds boring, but is actually pretty cool-looking and incredibly useful.
VIDEO: Making a stroked layer in Appearance
1. Open Illustrator, make a new doc, etc…
2. Using the “Window” menu, bring up the Tools, Appearance, Layers, and Color palettes (if they’re not already showing).
3. Make a big gray box with the rectangle tool (this is just to make the next steps easier to see). Lock the layer.
4. Create a new layer above the gray box. Name it “Test Layer.”
5. Pick any shape tool (rectangle, ellipse, star). Make a few shapes on “Test Layer.”
6. Select all the shapes and set their color to white fill, but no stroke. They should now appear as borderless white shapes (and you can actually see them ’cause you’ve got the gray box layer behind them).
7. Next to “Test Layer” in the Layers Palette, click on the little circle to the right to select all the contents of the layer (all those shapes you just made).
8. In upper right-hand corner of the Appearance Palette, click on the tiny pop-up menu symbol. From the menu, select “Add New Stroke.”
9. Still in the Appearance Palette, click where it says “Stroke 1 pt” and drag it down until it’s just below the word “Contents” (I’m sure there’s a more efficient way to do this, but I don’t care).
10. Try dragging your shapes around. Notice something cool: whenever the shapes overlap, there’s a black border around their combined shape only.
11. Think: “Hey! This would be awesome for word balloons and panel borders.” Pat self on back.
—
Part 2. Making the Classic Word Balloon Shape
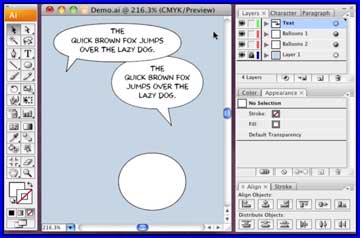
There’s no “right” shape for word balloons, of course, but if you do choose the traditional round style, as most cartoonists do, I strongly suggest avoiding the unmodified ellipse. It looks butt-ugly and doesn’t hold words well at all (especially if the words are in a rectangular text box—Blech!)
This is how to get that classic balloon shape that’s evolved over a century of trial and error.
VIDEO: Balloons and Tails
1. Keep that same document, but delete “Test Layer.”
2. Create a new layer called “Balloons” and another called “Text.”
3. Select the “Balloons” layer.
4. Select the ellipse tool.
5. Again, set color to white, no stroke,
6. Make a few wide ellipses of varying shapes.
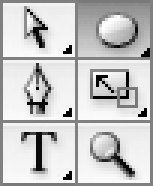
7. From the Tools Palette, pick the Direct Selection tool (the open arrow symbol).
8. Click-select the far end of one side of one of the ellipses.
9. Squash the ellipse, just a little, by moving the (now visible) control point a small distance toward the center of the ellipse. Do the same on the other side. There’s no right amount, just whatever you think it needs. Feel free to squash a bit on top and bottom as well, though it shouldn’t need it as much.
10. Create a couple of tails as well, using the pen tool.
11. Select the contents of the layer “Balloons” (see Part 1, Step 7).
12. Add the stroked appearance to the “Balloons” layer via the Appearance Palette just like last time (steps 8-10 from Part 1).
—
Part 3: Creating Balloon-Fitting Text
Next you’re going to want a text area perfectly fitted to the balloon. With luck, you’ll rarely have to use the return key when typing in dialogue. The words should just flow naturally into the available space.
VIDEO: Adding a Text Box
1. Using the same document you just made for Part 2, select the “Balloons” layer.
2. Select one of the balloons (just the modified ellipse, not its tail).
3. Pick the Scale Tool from the Tools Palette.
4. Click a little below the center of the selected balloon shape.
5. Shrink the balloon shape down about 70% by click-dragging the scale tool, while holding down the Shift and Option keys. (Basically, you’re making a copy, so now there are two shapes, one inside the other.)
6. Notice that the inner shape sits a bit low.
7. While the inner shape is still selected, pick the Type tool from the tools palette.
8. Moving the type tool cursor over the selected inside balloon shape, notice how the cursor changes appearance? When it’s just inside the balloon, it should change to a hexagonal shape indicating that it’s ready to put words inside the shape rather than on the outside. Go ahead and click there.
9. Try typing inside the small balloon shape. With luck, it should now be a round text area you can put words into.
10. Select the text box, and in the Layers Palette, drag its little color box on the right up to the “Text” layer (in other words you’re moving whatever is selected to that layer. (This is so that the words won’t have that stroked appearance that our balloons do, for those rare cases where the words might run outside the balloon).
11. Try resizing the balloon and text boxes.
—
Tomorrow: Adding Borders, and Creating the Your Own Template
…and why you’ll only have to do this stuff once!


